Persian love cake

Persian love cake

Adapted from Australian Gourmet Traveller.

This cake is gluten-free. It will be dairy free if you replace the butter and Greek yoghurt with coconut oil and coconut yoghurt.

Serves 8 | Takes 50 minutes

Ingredients

  • 360g (3 cups) almond meal
  • 1 cup packed rapdura/coconut/muscovado sugar
  • 120g unsalted butter, softened
  • ½ tsp salt
  • 3 eggs, lightly beaten
  • 250g Greek-style yoghurt, plus extra to serve
  • 1-2 tsp freshly grated/ground nutmeg
  • 1 tsp ground cinnamon
  • 45 gm (¼ cup) pistachios, coarsely chopped

Method

Preheat oven to 180C, and line and grease a 24cm springform cake tin. I suggest lining the sides of the cake tin with baking paper too.

Then combine the almond meal, sugar, butter and salt in a bowl. Rub the mixture with your fingertips to form coarse crumbs.

Spoon half the mixture into the prepared cake tin, and gently press to evenly cover the tin base.

To the remaining mixture, add the eggs, yoghurt, nutmeg and cinnamon. Beat with a wooden spoon until smooth and creamy (you could do this step in a food processor if you prefer). Then pour over the prepared base and sprinkle the pistachios around the edge.

Bake until golden (~35-40 minutes.) Cool completely in the pan on a wire rack. Serve with extra yoghurt. The cake will keep in an airtight container for up to a week, if it lasts that long!

Polenta uppuma – gluten-free

Uppuma is a traditional South Indian dish that’s typically made with semolina (suji). It can be made with or without vegetables, depending on one’s preferences, and is usually eaten for breakfast or as a snack.

Mum used to make uppuma for us as a snack with peas and grated carrot during my school years. These days, I make it very simply using organic polenta, for a gluten-free version. I don’t add any vegetables – because I serve it as the carb component to vegetable curries or dhal, instead of rice.

Recipe

uppamma

Serves 4 | Cooling time 30–40 minutes | gluten-free, dairy-free option, vegetarian, vegan option

  • 2 tbsp ghee, or coconut/extra virgin olive oil (vegan)
  • 1 tsp mustard seeds
  • 1 small (½ large) red onion, finely sliced
  • 1 stem curry leaves (optional)
  • ½ tsp cumin seeds
  • ½ tsp turmeric powder
  • ½ tsp chilli flakes
  • 1 cup fine organic polenta (non-instant)
  • 4 cups freshly boiled water
  • sea salt, to taste

In a medium-sized, heavy-based pot, heat the oil/ghee. Add the mustard seeds, and turn the heat to medium-high. Once the seeds start to pop, turn down the heat to medium and add the onion, cumin seeds and curry leaves.

Stir continually for up to five minutes, or until the onions caramelise. Add turmeric and chilli, and pan fry for another few seconds. Then pour in the polenta, and toast for a couple of minutes over gentle heat. Add the freshly boiled water, and allow the polenta to simmer gently. Stir often so the polenta doesn’t stick to the pan and become lumpy.

After about 10 minutes, stir in a teaspoon of salt. It’ll take roughly 20–30 minutes for the polenta to cook – you want it soft and creamy, not gritty. Taste to check.

Once the polenta is done, taste and add more salt if you wish.

Serve with dhal or any other type of curry that takes your fancy.

Variations

If you wish to eat your uppuma for breakfast (as a savoury porridge), you can add a small zucchini and carrot (both grated finely), and a ¼ cup of frozen green peas to the step where you toast the polenta (before adding the water), and serve it with one or two boiled/poached/fried eggs.

To cook polenta traditionally, with other variations, take a look at this post.


Choc-chip banana ice-cream

A couple of days ago my hubby saw bananas in our freezer and got really excited. For him, they can only mean one thing: banana ice-cream.

Being a food lover, and not necessarily of the wholefood variety, my husband surprised me when, after the first time I made it, he said, “This ice-cream tastes so much better than the ice-cream in the supermarket.”

So, it’s about time I shared it with you. Not only because the ‘most honest taste tester of them all’ has given it his big tick of approval, but also because this ‘ice-cream’ is deliciously healthy, and super quick and easy to make, with no trace of dairy or ‘added sugars’. Besides, it’d be mighty cruel of me not to share it with you.

Recipe

banana icecream

Serves 2 | Prep time 3 minutes! | dairy-free, gluten-free, vegan

Note: Make this ice-cream only when you’re ready to eat it, as freezing makes it icy. You could ‘re-churn’ it for a few seconds in the food processor, but it still won’t be a creamy as when it’s freshly made.

  • 2 ripe bananas, frozen
  • 1 tbsp 100% nut butter of choice (e.g. almond, peanut or ABC)
  • 1 tsp cacao nibs

Break frozen banana into large chunks and add to your food processor with the nut butter and cacao nibs.

Pulse until banana is smooth and a soft-serve ice-cream consistency.

Serve immediately.

Variations

You can make this ice-cream simply with just frozen banana. Or you can add other frozen fruit, such as mangoes.

I like to add a little nut butter for a creamer mouth-feel. If you’re allergic to nuts, use tahini or coconut cream instead.

You can also use a couple of squares dark chocolate (chopped into pieces) instead of the cacao nibs, but it will have added sugar.

Raspberry bakewell cake

There was a time, before I started this blog, where I’d collect recipes from the weekend’s newspaper. Not each one, just the ones that piqued my fancy.

I took a break from it when I got serious about food – too serious. Now, that I’m over that, I revisited this cake recipe (clipped in 2009) when I made it for a cousin’s birthday about a month ago, and just last weekend for my mother’s birthday.

The recipe is modified, of course, to make it more wholesome (you know me). Yet, the deliciousness remains intact – in fact, dare I say, it has upped the taste factor.

I find the cake is perfect for afternoon tea, shared with good friends over cups of herbal brews. And, since berries are in season – in Melbourne, at least – why not use fresh raspberries for the recipe? I did.

Oh, and, I’m happy to say, I’m back to the craft of clipping piquing recipes from the paper.

Recipe

IMG_7054

Serves 12 | Prep  + baking time 1 hour 35 minutes | Wheat-free (gluten-free + dairy-free options)

  • 1¼ cups (155 g) almond meal
  • ½ cup wholemeal spelt flour
  • ½ cup quinoa flour (or just use spelt flour)
  • ¼ cup desiccated coconut
  • 2 tsp gluten-free baking powder
  • 125 g butter, gently melted
  • ¾ cup rapadura or coconut sugar (or any brown sugar you have)
  • 3 large eggs
  • zest of 1 small (½ large ) lemon
  • 1 tsp vanilla extract or powder
  • 250 g fresh or frozen raspberries
  • 2 tbsp flaked almonds

Preheat the oven to 180°C (160°C fan).

Line and grease a 20 cm (no bigger!) springform cake tin.

In a food processor, add the first 10 ingredients and process until just combined (or you can do this step by hand, in a mixing bowl with a whisk).

Evenly spread half of the cake mixture (it’ll be quite thick) in the cake tin. Scatter over the berries in a single layer, top with the remaining mixture (it’s quite fiddly since the better is thick; and, don’t worry, you should have just enough).

Sprinkle the flaked almonds on top, then cover the cake tin with foil before placing in the oven.

Bake for one hour and 10 minutes, then remove the foil and bake for a further 10 minutes, until a skewer comes out clean. (total baking time is around 1 hour and 20 minutes).

Cool in pan. Best served warm – but still delicious at room temperature – either as is; or with some delicious cream, vanilla ice cream or lemon curd.

Variations

  • gluten-free – replace the ½ cup spelt flour with ¼ cup + 2 tablespoons brown rice (or buckwheat) flour and 2 tablespoons arrowroot flour; and add an extra egg.
  • dairy free – replace the butter with ½ cup macadamia nut oil or melted coconut oil.
  • different berry – try blackberries or blueberries.

Choc-banana ‘mousse’

I’ve seen a few renditions of chocolate mousse made with avocado.

And it’s the perfect substitute to traditional chocolate mousse, since it’s dairy and egg free, and full of heart-healthy monounsaturated fats from the avocado.

Recipe

choc-nana-mousse

Serves 4 | Prep time 5 minutes | dairy free, gluten-free, vegan, paleo friendly

  • 2 medium (or 1½ large) ripe avocados
  • 1 small (1/2 large) banana
  • 1/3–1/2 cup cocoa/raw cacao powder
  • ¼ cup pure maple syrup
  • 2 tbsp nut/coconut milk or coconut water
  • 1 tsp vanilla powder/essence
  • pinch Himalayan/Celtic salt

Add all ingredients to a high-powered blender/processor, and process until smooth and silky.

Use the higher amount of cocoa/cacao powder if you’d like it chocolatier. If you do this, you may need to increase the amount of maple syrup to balance the bitterness.

Refrigerate leftovers (if you have any!) in an airtight dish for up to 3 days.

Serving ideas

Serve as is, or sprinkle some nuts or cacao nibs for texture. It’ll go well with fresh berries in summer.

You can also use it as a filling to make individual mousse tarts, using a bliss ball mixture to make the base, or use this ‘cheesecake’ base to make the tart shell.

And to use it as a cake/muffin icing, add a little melted coconut oil/cacao butter/dark chocolate, so that it becomes firmer

Variations

  • sans banana — the banana helps to make the mousse lighter. If you’d rather not have any banana, just add another 2 tablespoons nut/coconut milk or water. You may need to add a touch more maple syrup too
  • different sweetener — try 4 fresh medjool dates, ¼ cup honey, or some stevia (only use stevia if you need it to be sugar-free)
  • jaffa — follow the sans banana variation, but replace the milk with freshly squeezed orange juice and a few drops of pure orange essence oil
  • choc-mint — follow the sans banana variation, and add a few drops of pure mint essence oil
  • choc-chilli — follow the sans banana variation, and add ¼ – ½ tsp cayenne pepper

Balinese-style peanut sauce

A few weeks ago, I stayed at the Satyananda Yoga Ashram near Daylesford for 3 days.

The life at an ashram is simple and community-based, with 4 hours of karma yoga — a selfless service of doing set tasks {e.g. cleaning, washing, gardening, cooking etc} around the ashram, daily.

What I particularly loved about the ashram was the wholesome food. We had 3 simple, yet delicious meals.

Most of the food was grown in the ashram garden or bought from local farmers within the region.

For breakfasts, we had warming porridges with stewed pears, which we ate in silence. And wholesome vegetarian, legume-based meals with roasted veggies, salads or sautéed greens for lunch and dinner.

Fresh fruit and tea were served for morning and afternoon tea.

There were no TVs or gadgets in sight {the ashram is a mobile free zone} to distract us from our delicious meals.

On my last evening, I had quite an exceptional meal of steamed brown rice, tempeh, sautéed greens and a Balinese-style peanut sauce, otherwise known as satay sauce.

At first, I was a bit hesitant to have some, because Western renditions of peanut sauces are sweet. Julia, the lovely lady who made it, happens to be married to a Balinese, and assured me it was authentic.

I had to go back for seconds and ask her how to make it. She rattled off a list of ingredients, and a rough idea of how to make it. So I hope my version does it justice. It’s not quite like hers, but it’s certainly yummy.

Recipe

photo-4

Makes 3 serves | cooking time 15–20 minutes | dairy-free, gluten-free, paleo-friendly, vegan-option

Cooking notes: If you can’t be bothered roasting your own peanuts, and to save some time, use roasted, unsalted peanuts without their husks.

  • ¾ cup organic raw peanuts {shelled & husked}
  • ½ red onion, finely diced
  • thumb-sized knob {20 g/0.044 lb} ginger, finely chopped
  • 4 garlic cloves, finely chopped
  • 1 small red chilli, finely chopped
  • 1 tbsp coconut oil
  • ½ tsp turmeric powder
  • 1 tbsp tamari {gluten-free soy sauce}
  • 1 tbsp fish sauce, preferably sugar-free
  • ¾ cup filtered water
  • juice of ½ a lime, or to taste

Preheat oven to 170°C/340°F {150°C/300°F fan-forced}

Line an oven tray with unbleached baking paper, and roast peanuts for 10–12 minutes unlit lightly browned. Remove and allow to cool.

In the meantime, heat the coconut oil in a small frypan, and sauté the onion, ginger, chilli, garlic and turmeric over low heat for approximately 5 minutes, until the onions have lightly caramelised.

Into a high-powered blender/processor, tip the sautéed mixture with the roasted peanuts, tamari and fish sauce. Pulse few times to breakdown the nuts.

Next, add the water and blend on high speed, until you have a chunky sauce. If you’d like it smoother, blend for longer. And if you’d like a runnier sauce, add more water.

Add the lime juice. Taste and adjust seasoning with tamari or fish sauce, and add more lime juice if preferred.

Serve with anything you like. Works well with steamed/sautéed veggies, tempeh/tofu or chicken, and brown rice or quinoa. Can also be used as a dip for grilled chicken skewers. I’ve added it to Asian-style soups too {to add a bit of creaminess when I didn’t have any coconut milk}.

Will keep refrigerated in an airtight jar up to 3 days. Or you can cook the sauce {lightly simmer for a few minutes} to store in fridge up to a week.

Variations

  • vegan — replace fish sauce with umeboshi vinegar or shiro miso {or use a mixture of both}.
  • peanut allergy — try this with cashews. May need more lime juice to balance the flavour, as cashews are sweeter than peanuts.
  • nut-free — try it with sunflower seeds.

Kale chips

When first encountering kale, one might be a bit dubious about eating it.

The leaves and stems look hardy, and can be extremely dark green or purple in colour, depending on the variety.

However, it’s worthwhile giving kale a try. Being part of the brassica family, it’s full of goodness.

So don’t let it’s looks {I actually think kale looks rather beautiful} or any past bad experiences put you off — the method of cooking and flavourings you use are what can really make a food shine.

Here are some ways I’ve enjoyed kale:

  • in my dhal
  • added to soups
  • blended in smoothies
  • juiced
  • omelette
  • sautéed in coconut oil, garlic and some spices
  • kale chips! {recipe below}

Kale chips

photo-4

If you haven’t tried kale before or want to entice kids {or partners} to eat kale, kale chips is a fun and non-threatening way to do it.

Serves 2–3 | Cooking time 15 minutes | dairy-free, gluten-free, vegan

  • ½ large bunch curly kale {green or purple}
  • 2 tsp coconut oil {melted} or cold-pressed olive oil
  • 2 tsp tamari/soy sauce {use wheat-free tamari for gluten-free}
  • 1 tsp mirin, optional

Heat oven to 170ºC/340ºF {150ºC/300ºF fan-forced}

Line an oven tray with unbleached baking paper

Remove the kale stalks by holding the end of the stalk, then running your fingers down it, shearing the leaf off

Tear kale leaves into large pieces, then wash and spin dry in a salad spinner or pat dry using a paper towel

In a bow, toss the leaves with the remaining ingredients. Use your fingers to help coat the leaves

Lay leaves flat onto the lined tray and place in the oven

Bake for 10–15 minutes {check at about the 8 minute mark, then again every couple of minutes; you’re looking for dried crisp leaves, but need to be careful as they burn easily}.

{Tip: you can chop the stalks and use in blended soups so they don’t go to waste.}

Serving suggestions

I like to serve kale chips as part of a meal for added micronutrients, fibre and texture. I’ve served it atop soft meals for extra texture, like soups, dhal and salads — only adding a few chips at a time so they don’t get soggy.


Are chia seeds really that super? + Chia pudding

the-almighty-chia

It seems that everyone is jumping onto the chia bandwagon, even champion surfer Kelly Slater, who’s also become a huge advocate

But, what’s so super about chia?

Chia seeds are gluten-free, and for its tiny size, chia packs a mighty nutritional punch — hence its superfood label. Interestingly, chia is the Mayan word for strength, and it’s derived from the Aztec word chian, meaning oily. The Southwest American Indians ate chia for sustenance during endurance contests. Latin Americas use them to treat constipation. [Source]

Chia’s etymology {origin of word} and historical uses give us great clues about its nutritional qualities.

A serving of 2 tablespoons {~28 grams/1 ounce} of chia seeds contains: 4 g of protein {which is complete}; 9 g of {healthy} fats, 10 g of fibre {about a third of the recommended daily intake [RDI] for adults}, and 18%, RDI of calcium. It’s also exceptionally high in antioxidants, phosphorous, manganese, magnesium and iron, as well as alpha-linoleic acid {omega-3 long chain fatty acids}. [Source]

Sure, chia is jam-packed with nutrients that make it super, but it’s not the be all and end all if you’re not eating well or looking after yourself overall.

I find chia seeds don’t really have a taste, but, in texture, they’re crunchy when dry, and slippery and gelatinous when soaked into wet ingredients {which can take a bit of getting used to}. It’s pretty expensive too. If you’d like to try it out, though, here’s an easy recipe.

Chia breakfast pudding

chia-pudding

Serves 1–2 | Prep time 5 minutes + soaking time | dairy-free, gluten-free, grain-free, paleo-friendly, vegan

  • 1 cup milk of choice {e.g. dairy, nut or coconut milk}
  • 1 medjool date, pitted {or 1 tsp honey/maply syrup}
  • ½ tsp cinnamon powder
  • ¼ cup chia seeds {black, white, or both}

The night before, in a blender, process together milk, date and cinnamon until the date has blended into the milk.

Pour the milk mixture into a clean glass jar and stir in the chia seeds. Mix well.

Place jar into the fridge.

Next morning, serve with any of the suggested toppings {or anything that takes your fancy}.

Suggested toppings

  1. tropical: pecans, banana slices, toasted coconut flakes
  2. superfood: cacao nibs + goji berries
  3. bircher: grated apple + toasted almond flakes

Variations

  1. choc-chia: when blending, add 2 tsp of cacao powder + an extra date or tsp of honey/maple syrup {to balance the cacao bitterness}
  2. berry chia: when blending, add a 1/3 cup frozen berries and replace the cinnamon with ¼ tsp vanilla powder/essence
  3. yogi chia: instead of milk, use ½ cup natural yoghurt and ½ cup coconut water to make up the 1 cup liquid portion

14 yummy ways to eat Brassica’s + a soup

Is there anyone out there who absolutely loves Brassica vegetables? You know, broccoli, cauliflower, cabbage, and the like?

I do. As a child, I got {very} lucky because my mum never subjected these vegetables to boiling until they became limp and tasteless. Instead, they were always beautifully flavoured with spices and still al dente once cooked.

Even if you’re someone who feels ‘meh’ about broccoli or other Brassica veggies, I’m pretty sure you’ll still get something out this post.

Why eat brassicas?

brassica11

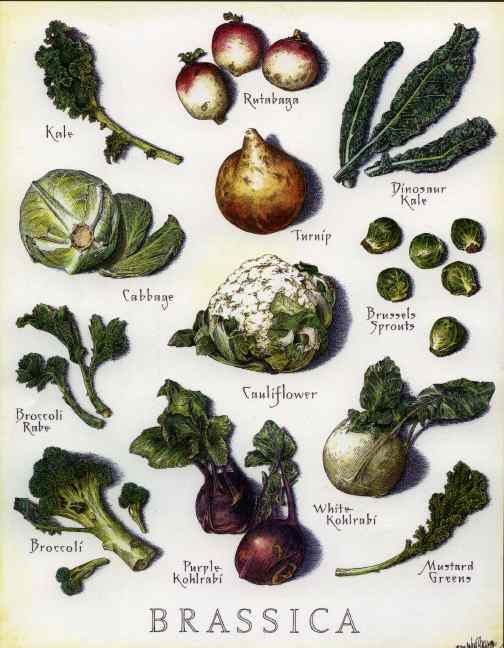
The brassica {aka cruciferous} family of vegetables includes cabbage, Brussels sprouts, kale, cauliflower and turnips.

These groups of vegetables are high in carotenoids (e.g. beta-carotene); vitamins C, E, and K; folate; chlorophyll; and minerals. They’re also a good source of and fibre.

But it’s the high amounts of sulphur-containing phytonutrients {glucosinolates} that make brassica vegetables extra special.

These phytonutrients are linked to cancer prevention and other health benefits, such as anti-inflammatory, immune supportive and antibacterial properties.

During food preparation {like chopping}, chewing, and digestion, the sulphurous phytonutrients in cruciferous vegetables are further broken down to become active nutrients, such as indole-3-carbinol and sulphoraphane —these 2 nutrients are studied often for their anticancer effects.

Unfortunately, it’s the taste and smell of these sulphur-containing nutrients that can turn people, especially kids, off from eating Brassicas. From experience, I feel over-boiling accentuates the off-putting, sulphurous smell and taste.

Some general guiding principles for enjoying cruciferous vegetables and retaining their nutrition is to lightly steam, sauté {pan-fry}, bake or add them to a soup/curry/casserole towards the end of cooking process, so they’re not over-cooked. And to adding delicious flavours like herbs and spices is a must!

Here are some suggestions.

14 yummy ways to eat {& enjoy!} Brassica veggies

  1. Revolutionary Brussels sprouts
  2. Cauliflower pizza
  3. Fail-proof sauerkraut
  4. Yummy homemade coleslaw
  5. Crunchy cauliflower tabbouleh
  6. In a vegetable stir-fry with ginger, chilli & tamari/soy sauce
  7. Chunky cauliflower & cannellini bean soup {recipe in Nourished ebook}
  8. Kale omelette
  9. Lightly steamed broccoli/cauliflower & dressed with a deliciously creamy tahini sauce; or olive oil/butter, lemon juice & seasoning
  10. Lightly steamed broccoli/cauliflower & added to a salad
  11. Roasted broccoli/cauliflower with spices & served as a side or added to a salad
  12. Sautéed with Asian or Indian flavours
  13. Roast beetroot & steamed broccoli frittata
  14. Creamy broccoli soup with Asian flavours {recipe below}

Creamy broccoli soup with Asian flavours

photo

serves 4 | cooking time 35–40 minutes | dairy-free, gluten-free, grain-free, vegan option

  • ½ cup cashews soaked overnight {or up to 2 hours} & drained
  • 2 tbsp coconut oil
  • 1 onion, finely chopped
  • thumb-sized knob {~20 g/0.044} ginger, fined grated or minced
  • ½ tsp chilli, or to taste
  • 1 medium potato, diced into small chunks
  • 3 ½ cups chicken or vegetable stock
  • 1 cup coconut milk
  • 3 small–medium {~ 700 g/1.5 lb} broccoli heads & stems, chopped into chunks {Note: peel off the tough skins on the stems}
  • 2 tbsp tamari sauce {wheat-free soy sauce}
  • juice of 1 lemon/lime, or to taste
  • Celtic/Himalayan salt, to season
  • fresh coriander, to serve

Heat oil in a heavy-based soup pot over medium flame.

Add onions and sauté until translucent.

Turn hob down to low, and add the ginger and chilli. Continue to sate until the onions and ginger have lightly caramelised.

Add the potatoes. Sauté for about 5 minutes, stirring continually.

Pour in the stock and bring to a boil over high heat, before turning down to a simmer.

Simmer the potatoes until cooked through but still firm {depending on how small you chopped the potatoes, this could take 5–10 minutes}.

Next, add the broccoli, cashews and coconut milk, and bring back to a gentle simmer.

Continue to simmer until the broccoli is just cooked until al dente — firm and still bright greening colour {about 5–8 minutes}.

Turn off the heat, and blend using a hand-held blender — or very carefully pour the soup into a blender to process {make sure the lid is on properly, and blend with great care!}.

Once blended, add more hot stock or water if you’d like a thinner consistency.

Stir in the tamari and lemon/lime juice {make it as tart as you like to balance the sweet creamy flavours of the cashews and coconut}.

Taste and season to your liking.

Serve with fresh coriander sprinkled on top.

Leftovers can be refrigerated for up to 4 days. Freezes well.

Variations

  • Try this soup with cauliflower instead of broccoli
  • Don’t like coconut milk? Replace with 1/2 cup real cream or 1/4 cup of thick natural yoghurt

Serving ideas

This soup is light on protein. You can serve it with a poached egg on top or some yoghurt/grilled haloumi/feta, and a slice of real sourdough/gluten-free bread on the side.

Black-eyed beans curry with eggplant & spinach

Legumes in general are wonderfully healthy, as they’re high in plant protein, fibre and complex carbohydrates.

They’re delicious too, but can take some time to cook. That’s why I have a soft spot for black-eyed beans — they cook really quickly in comparison to most beans.

This dish is similar to what my mum used to for cook me, and one that I absolutely love. I hope you enjoy it too.

black-eyed-beans-curry-2

Serves ~3–4 | Cooking time 45 minutes + soaking time | Gluten-free, Vegetarian, Vegan/Dairy-free option

  • ¾ cup black eyed beans, soaked overnight {or 6 hours}, rinsed & drained
  • 2 tbsp ghee {clarified butter}, or coconut oil for a vegan/dairy-free option
  • 2 tsp mustard seeds
  • 1 onion, finely sliced
  • 2 tsp cumin seeds
  • 4–6 cloves garlic finely diced or minced
  • 1 small knob ginger {20 g/ lb}, finely grated or minced
  • 1tsp chilli flakes, or to taste
  • 1 tsp turmeric powder
  • 2 small-medium {450g/ lb} aubergine {eggplant}, diced
  • 4 large handfuls baby spinach leaves
  • sea salt, to taste
  • freshly squeezed lemon juice, to taste

In a heavy-based pot, heat the ghee/oil over medium heat.

Add the mustard seeds.

Once the mustard seeds begin to pop, add the onion and cumin seeds, and sauté.

When the onions soften a little, add the garlic and ginger, and turn the heat to low.

Sauté for another couple of minutes before adding the turmeric and chilli.

Continue to sauté, toasting the spices in the oil, and until the onions become lightly browned.

Add the black-eyed beans and diced aubergine, stirring thoroughly to coat with the yummy spices.

Sauté for a couple of minutes, then pour in 1 cup freshly boiled water, and add a teaspoon of salt.

Bring to a boil, before turning down the heat to a very gentle simmer. If you have a heat diffuser {dissipater}, place it under the pot.

Place the lid on the pot, but leave it partially off to let some steam escape

Let the curry simmer for 20–25 minutes {you will still need to check on it periodically and stir occasionally}, or until the beans have cooked through and the aubergine soft and creamy. Most of the water will be absorbed by the beans.

Next, mix in the spinach leaves, stirring until they wilt.

Taste and add more seasoning to your liking.

Turn off the hob, and store in the lemon juice before serving.

To make the meal nutritionally complete, serve with cooked brown rice or quinoa. Add some extra veggies with a green salad or steamed greens. For added deliciousness and satisfaction, serve and with a dollop of natural yoghurt {or raita}, sauerkraut/kim chi, or any condiment of choice that’s a little tart and salty.

Makes great leftovers. Will keep in fridge for up to 4 days in an airtight container, or you can freeze it.